Bear Paw Print with Bear Wall Sign: A Practical Guide to Laser Cutting and Digital Design
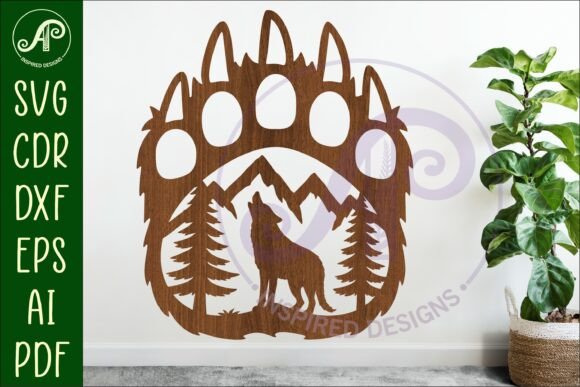
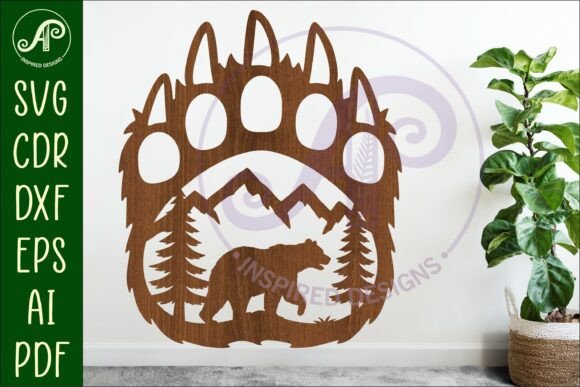
There is a distinct charm to rustic decor that brings the outdoors inside, and few motifs capture this aesthetic as effectively as the Bear Paw Print with Bear Wall Sign. Whether you are a seasoned woodworker, a hobbyist with a new laser cutter, or an entrepreneur looking to expand your product line on platforms like Etsy, digital cut files offer a streamlined path to creating professional-grade art. However, the ease of purchasing a digital download often leads to overlooked technical details that can compromise the final result.
This guide focuses on the practical realities of working with vector files for craft machines. By understanding common pitfalls in file selection, scaling, and material preparation, you can ensure your projects meet high standards of quality and durability.
Understanding the Digital Asset
The Bear Paw Print with Bear Wall Sign is not a physical product but a digital blueprint. It typically arrives as a compressed zip folder containing multiple file formats, including SVG, DXF, AI, PDF, and CDR. These formats are designed for compatibility with various software ecosystems, from Adobe Illustrator and CorelDraw to direct-import laser cutter interfaces.
The primary appeal lies in versatility. The design is usually saved at a standard reference size, such as 29.5cm (approximately 12 inches) tall, but because it is vector-based, it can be scaled infinitely without losing resolution. This makes it suitable for small coasters or large statement pieces ranging from 20 to 50cm or more. However, assuming that "download and cut" is a foolproof process is the first mistake many creators make.
Mistake 1: Ignoring File Format Compatibility
One of the most frequent errors involves selecting the wrong file format for your specific machine or software. While SVG is widely regarded as the universal standard for web and basic cutting machines, it is not always the optimal choice for industrial CNC routers or older laser systems.
The Problem: Some SVG files contain nested layers or metadata that certain CAM (Computer-Aided Manufacturing) software misinterprets. This can lead to unexpected tool paths, such as the laser cutting interior details before the exterior outline, causing the piece to shift and ruin the cut.
The Solution: Always check the included formats. If you are using CorelDraw, the included CDR file is often the safest bet as it preserves layer integrity specifically for that environment. For users of AutoCAD or industrial routers, the DXF format is preferable because it strips away stylistic data, leaving only pure geometric paths. If you are using a consumer-grade laser like a Glowforge or xTool, the filled SVG single layer option is ideal because it simplifies the import process, treating the design as a solid shape rather than complex vectors.
Mistake 2: Overlooking Scale and Material Constraints
The product description recommends a cutting size between 20 to 50cm. Many beginners ignore this guidance, either shrinking the design too much or expanding it beyond the structural limits of their chosen material.
The Problem: Scaling down a intricate bear paw design below 20cm can result in fragile bridges between the toes and the pad. These thin sections may burn through entirely or break off during handling. Conversely, scaling up without adjusting kerf compensation (the width of the laser beam) can cause joints to fit poorly if the sign is part of a multi-layer assembly.
The Solution: Before cutting your final material, perform a test cut on cardboard or scrap wood at your intended size. Check the structural integrity of the narrowest points in the paw print. If you are cutting metal or thick acrylic, ensure your machine’s bed size can accommodate the larger 50cm dimension. Remember that the Bear Paw Print with Bear Wall Sign is formatted with exterior cut lines in blue for easy identification; use this visual cue to verify that the scale looks correct in your software preview before sending the job to the machine.
Mistake 3: Misinterpreting "Digital Download Only"
It sounds obvious, but confusion regarding the nature of the transaction causes unnecessary friction. This listing is for a DIGITAL DOWNLOAD ONLY; no physical item will be mailed. Yet, customers occasionally expect a finished wooden sign to arrive at their doorstep.
The Problem: For sellers, this misunderstanding leads to negative reviews and chargebacks. For buyers, it results in disappointment when they realize they need access to specific hardware and software to utilize the purchase.
The Solution: Clarity is key. If you are buying, ensure you have the necessary equipment—a laser cutter, CNC router, or compatible craft machine—before purchasing. If you are selling similar designs, explicitly state in your product images and description that this is a DIY resource. Emphasize that the value lies in the Handmade Design potential, allowing the user to create unlimited physical copies from a single purchase.
Optimizing Your Workflow for Better Results
To get the most out of your Bear Paw Print with Bear Wall Sign files, adopt a systematic approach to preparation.
- Extract Files Immediately: Do not try to open files directly from the zip folder. Extract all contents to a dedicated project folder on your computer. This prevents read-only errors and ensures all linked assets load correctly.
- Verify Vector Integrity: Open the file in your design software and zoom in on the curves of the paw pads. Look for stray nodes or broken paths. High-quality files like those in the AI or CDR formats should have smooth, continuous lines. If you see jagged edges, you may need to simplify the path or use a different format.
- Color Coding for Operations: The design comes with exterior cut lines in blue. Use this to your advantage. In your laser software, assign specific power and speed settings to the blue lines. If your design includes engraving elements (though this specific sign is primarily a cut-out), ensure they are on a separate layer with distinct color coding to prevent the machine from cutting when it should be etching.
Choosing the Right Material
The file format is only half the battle; the material you choose defines the aesthetic. For a rustic look, plywood or reclaimed wood works beautifully with the bear motif. The laser will char the edges slightly, adding to the rugged appeal. For a modern twist, consider acrylic or matte-finish metal sheets.
When cutting wood, remember that grain direction matters. Align the longest part of the sign vertically or horizontally depending on the grain strength to prevent warping over time. For metal cutting, ensure your file is optimized for plasma or fiber laser parameters, which may require thicker line weights than those used for wood.
Final Checks Before Production
Before you commit to your final material, take a moment to review the following checklist:
- Have you selected the correct file format for your software (SVG for web/consumer lasers, DXF/CDR for professional tools)?
- Is the scale set within the recommended 20–50cm range, or have you verified structural integrity for custom sizes?
- Have you extracted the zip folder and inspected the vectors for errors?
- Do you understand that this is a digital tool for creation, not a finished product?
By approaching the Bear Paw Print with Bear Wall Sign with a mindset focused on technical precision and material awareness, you transform a simple digital download into a high-quality, professional-grade decoration. Whether for personal enjoyment or commercial sale, attention to these details ensures that your final output reflects the care and craftsmanship inherent in the design process.